The making of this blog, part 8 - Analytics v2
Analytics is better than a text file
2022-11-02python web making_of flask gunicorn docker nginx cloud analytics shynet certbot
Back in Part 4, I wrote about my
experiences with logging, using Python's built-in logger to just record IP
addresses of everyone who visited a site. It was pretty naive, and lots of
better analytics solutions exist, so it has been on my README.md TODO list for
a while to update it to a modern solution.
Open source and privacy respecting analytic solutions
It sounds like an oxymoron, but there are ways to have analytics for your site that respect the privacy of your users, comply with GDPR, and don't require cookies. Privacy is a priority for me, but I also wanted to know how many people were using my site, and from where, which I think will be especially interesting if the diffraction pattern simulation ever actually takes off. I also wanted to be able to self-host whichever platform I chose.
Since I'm not interested in tracking people across the web or keeping track of users across sessions, there were ~~infinite~~ 2.5 frameworks that came up somewhat often while searching around and seem to satisfy my requirements, mainly Matomo, Plausible, and Shynet.
There also exists Umami, and I'm sure many others
In comparing the three, the general understanding is that Matomo is used when you want a Google Analytics alternative, Plausible is the smaller, easier to set up one, that also offers a paid solution (like Matomo), while Shynet is personal project (written in Python!) that promises to be as small as possible and is completely open source. I went with the third, since I wanted the most minimalist analytics possible, as my initial idea was that I would run it on the same cloud instance as my site, so it should consume as few resources as possible. I have the feeling that something written in Go or Rust might be better than Shynet, with Python, but on the flip side, I can read the code much more easily. This is to say, I went with Shynet, but do not take my word as gospel.
Setting up Shynet
Shynet supports both docker and docker compose, so it should be pretty easy
to set up!

docker compose, after convincing everyone that setting up projects is easy.Here's how I thought it would go - I set up Shynet in my services directory,
add the relevant parts of their Docker compose file to the one I use to run my
site, and then run the containers, and everything works. Once again my lack of
knowledge is unfathomable.
Adding Shynet to my repo
The first thing I needed to do was add Shynet to my repo. One common way of
doing this is through git submodules, which allows you to nest repositories
within each other, and then be able to pull/push to them individually. This was
my first approach.
I quickly decided this wasn't a good approach, and was just a little too
complicated. I had to change files within the Shynet repository, but I also
didn't want to fork the main repo, leaving my changes somewhat stranded. I
didn't see a good way to change files in the submodule and be able to git pull
them into whatever cloud instance I was using without a lot of headache.
So, I used
these instructions
as a guide to turn my submodule just into a folder. In the end, it was pretty
easy as I hadn't committed the submodule yet, I didn't need to do those steps
exactly but rather just delete the relevant .git file and .gitsubmodules
file. Step 1 done - code was in my repository.
Setting .env variables
Step 2 of the setup says to use
TEMPLATE.env as
a template for your .env file, which is used by Docker to populate environment
variables in the containers. I already had one line set up with my Materials
Project API key, but this would be adding a lot more. Remember, to get the
.env file to the server, I've used scp to copy the file to the server as I
don't want to share the environment variables/secrets to the open source
community.
Anyways, first, I just copied and pasted all of TEMPLATE.env to my .env
file, and began changing things accordingly. I decided to go with SQLite as a
database, so I commented out all of the Postgres lines, and uncommented the
SQLite ones. I also commented out all of the email lines, as I didn't think I'd
use that at al.
Moving downwards, I also commented out the Django secret key as I... don't know what it does. I bet that is unsafe but maybe it is ok.
With regards to the allowed hosts, I originally changed the lines to
tcpekin.com and https://tcpekin.com respectively.
The last line that I was very unsure of was PORT=8080. Initially, I left it as
it was.
The rest of the .env file, copied from TEMPLATE.env, I left as the default.
With that done, I moved to step 3.
nginx returns, with a vengeance
The way the base Shynet repo is set up, it is designed to run somewhat
separately from your site's web server, as it expects to have the root domain
/ as it's base URL. I will explain more on this later, but essentially the
base repo comes with a nginx container that deals with all of the reverse
proxying needed for the analytics and dashboard. That can be seen
here.
However, I wanted a slightly different setup, I wanted to run the analytics
platform on the same instance as my site, and instead of it having the root
domain, give it /admin/ or something like that. Being the absolute master of
nginx, I thought that could be done with a pretty simple server block, and
then Shynet would know what to do.
What I first tried to do was simply changing the nginx.conf file's hostname to
tcpekin.com, thinking that Shynet's Docker compose file would be able to run a
second nginx container that only dealt with Shynet things.
Updating docker-compose.prod/dev.yaml
In order to homogenize the docker-compose files, I simply copied (and
reformatted) Shynet's
docker-compose.yaml
file, appending it to my own. Each of the containers in Shynet's YAML file would
then also be launched by YAML file. I still was very lost with how ports worked,
so I just set the ports such that they matched the nginx file, and roughly
followed the documentation.
When I first tried to run these Docker containers, all together, several
problems arose. The first, and what I'm learning more and more, is that HTTPS
and nginx really don't like to be run locally. I haven't set up the
certificates necessary to run HTTPS stuff locally, and using nginx to parse
localhost requests feels very odd. So, I committed the files, and pulled it
over to the cloud instance.
The relevant files that I had changed were (links go to the commit diff):
- the Docker YAML file
- the Shynet
nginx.conffile
Testing on the cloud
This failed, of course. There were a myriad of problems, one of which was that
there were two nginx instances. That's both complicated to reason about and
they don't necessarily communicate with each other so well. At this point, I
realized that the analytics webserver could be run completely independently of
my site, and doesn't need a ton of ports or files shared between the site
webserver and analytics webserver.
That simplified things a bit, so I decided to move forward using only one
nginx proxy, which sends requests to either my Flask app or the analytics
platform, dependent on what URL the proxy receives.
Modifying nginx
My
next commit
removed the Shynet webserver, and added a /admin/ location in the nginx.conf
file. I truly thought this would work.
This did not work - Shynet
cannot use a base URL, and
instead wants / as a base URL, which I mentioned above. At this point I was a
little lost.
Subdomains
After reading a lot on StackOverflow about other people wanting to run two
nginx instances so that they can run two webservers, it seemed like the way to
go was to use subdomains, i.e. admin.tcpekin.com instead of
tcpekin.com/admin.
Stylistically, this makes sense. One of the mental frameworks that I have for
the web, is that everything after the domain can somewhat be visualized as a
directory tree structure. Therefore, everything on tcpekin.com can be thought
of as a single directory/computer with subdirectories. Then, using a subdomain,
like admin.tcpekin.com, would be another service, that also has access to it's
filesystem root /, which is more separate (/ on a new computer/domain) than
just a subdirectory in the same domain/computer.
Setting up a subdomain
The first step for setting up a subdomain is to actually go to my site registrar, Porkbun, and set one up. Luckily, they had some very helpful instructions that I just followed word for word.
This commit
was my attempt at setting up a subdomain. As you can see, the main change is to
modify nginx.conf with two new server blocks, one listening on port 80 for
HTTP, and the other 443, for HTTPS, both of which are pretty much copied and
pasted from above in the same file. The main change though, is the
server_name admin.tcpekin.com instead of server_name tcpekin.com. That's all
that needs to be done!
❗️ Note: the .env file PORT= needs to be set to the same port that the
proxy_pass request is passed to! In my case, (in this commit) in the Shynet
block, I have proxy_pass http://shynet_webserver/;, so PORT=80
To understand the admin.tcpekin.com blocks more, the following addition takes
HTTP requests on port 80 and forwards it to the HTTPS version:
1 2 3 4 5 6 7 8 9 10 11 12 | |
In the next block, requests to the root address are proxied to http://shynet/
(port 80!), which I learned is just the name of the Docker container. I'm still
not sure how nginx knows about other Docker container names but it works. The
rest of the block is the same as the previous HTTPS block, with regards to where
certificates live and what not.
1 2 3 4 5 6 7 8 9 10 11 12 13 14 15 16 17 18 19 20 21 | |
We're almost there.
Additional changes from the default installation and HTTPS
The following change also needed to be made in the .env file.
1 2 | |
Once these changes were made, starting the Docker containers led to a
functioning site!! However... HTTPS wasn't working, as my certificate was only
valid for tcpekin.com and www.tcpekin.com, and the SQLite database was read
only. This was actually so frustrating, as I really thought I was done.
The database was easy to fix - based on what I had seen previously, when the
database file is being created in a Docker container, root owns the file. I
just had to chmod 777 + chown ubuntu:ubuntu that file, and it was then good
to go.
HTTPS was trickier. In the end I had to
add admin.tcpekin.com
to my list of domains in my init-letsencrypt.sh script from Part
7, and redownload the certificates.
To do so, I did a couple of things, and I'm not sure which was the silver
bullet.
This was required since certbot
can't deal with wildcard domains.
First, I had to run the docker compose up command as a background daemon
before I ran the init-letsencrypt.sh script, as nginx should be running. I
ran the script a few times and it kept failing - it turns out the certificate
for admin.tcpekin.com is still under the tcpekin.com directory, even though
it is a subdomain (see nginx.conf file).
Additionally, after the first time I chown'd everything in services to
ubuntu:ubuntu, so that root wasn't messing with permissions. With that done,
the certificates and site officially authenticated and downloaded... as
tcpekin.com-0001, with the trailing numbers as last time. I followed the
instructions found
here
again, as I did in part 7, and then... everything worked!
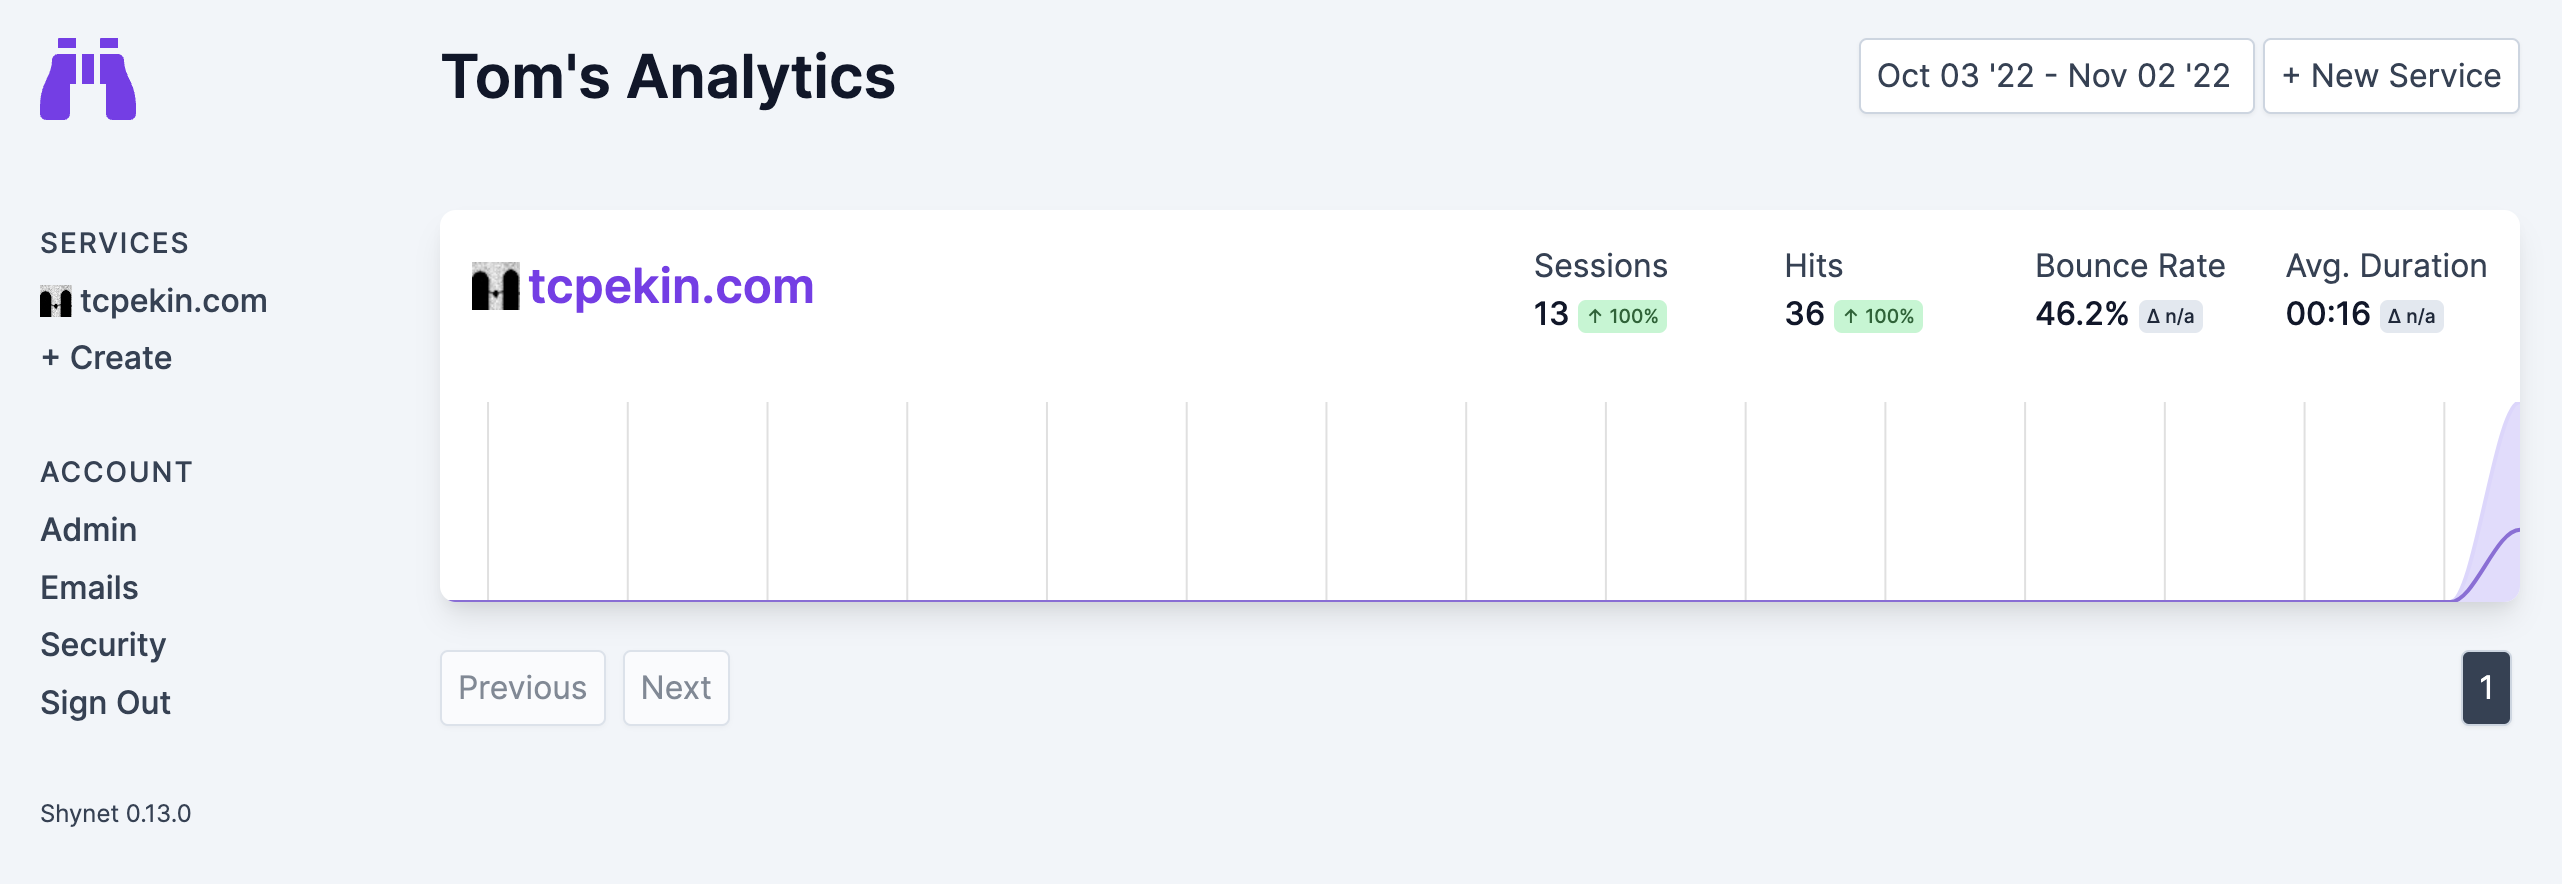
I followed the rest of the instructions on how to set up a user, add a
whitelabel, and generate a tracking script. That was done by logging into
admin.tcpekin.com and adding a new service. I then put the tracking script
into my site's body (in layout.html), and then I could log into my dashboard
and see my stats! All without the use of cookies, and without JavaScript if that
is disabled!
Conclusions and future ideas
Once again I was surprised at how long everything took. I really wish it would have been faster, but I am very happy with the results. One funny thing was that I was very confused initially since I didn't see myself show up as I was clicking around my own site - I could see myself via Safari and my phone, but not my normal when using Chrome, my normal browser. It turns out I have Do Not Track turned on in Chrome, and Shynet respects that. That was good to fine out 😅.
Right now, everything is running fine in one repository. Now having set it up though, I understand more Shynet's approach of having it be a separate service. On the Oracle instance that I run it on, I think running both is really pushing the computer to the limit - memory utilization is >90% and the site to me feels noticeably slower.
In the future, what I should do is use my other free Oracle instance as solely a
Shynet running webserver, which I think would be much simpler to set up. Once I
do that, it would relieve the load on each of them, and remove the complexity of
bundling them into the same nginx.conf file and docker-compose file. It
would, however, add complexity in the HTTPS certificates and getting the
instances to talk to each other.
With regards to the certificates, I think I would need to start from ground zero
again with those, I can't just use the same certificates copied onto a new
instance. I would also need to update Porkbun's DNS resolver. Getting the
instances to talk to each other actually wouldn't be too hard, as they don't
really need to talk to each other, as Shynet just needs to generate some HTML
that I embed into my site's body.
In the end it would be worth the change, but I'm not ready to do that right now. For now... I'm just going to enjoy the site working 🙌.
I don't have much else to say, I'm just happy analytics works and the site is one step closer to being fully functional!