The making of this blog, part 3 - Local → remote
Sometimes the Flask development server just isn't enough
2022-10-10python web making_of flask gunicorn docker nginx cloud
At the end of my last post the site worked... locally. The next step was getting it on the internet, and to do that, there are a million different ways and questions. Should I host it myself on a computer I just leave on at home? How exactly do you even host a website? I don't expect many visitors - can I host it on some free cloud platform (and then also learn how those platforms work)? What platform then (if anyone can really simply differentiate all the different major cloud offerings I'd be very appreciative, I was so lost especially with all the things Google offers 😅)? How do I get my code onto something in the cloud? How can I ensure that py4DSTEM installs correctly (never the simplest question)? With these questions in mind, I started doing some research.
Switching from Flask → Gunicorn
The first thing I did was looking at setting up an actual production server.
When you start a flask app with flask run (the other optional parameters to
flask that you see in other tutorials are controlled via a package called
python-dotenv
and the .flaskenv
file),
the first thing that prints is
1 2 3 4 5 | |
which explicitly says only use the Flask server for testing. Luckily this is an
easy first fix, as the Flask documentation suggests using
Gunicorn. This
is a simple change, from flask run to
gunicorn -w -4 --bind 0.0.0.0:5001 blog:app. This adds a few parameters, for
how many workers you want (important later, but not entirely sure what they do.
I think help with multiple connections?), bind to an port, and then finally call
the app itself. blog:app is the filename:flask_instance. In my case this is
blog.py and app, so it is blog:app. Straightforward, and wasn't too hard
to figure out.
Creating a conda lockfile
The next step was to put the code somewhere and run it on someone else's
computer so I could actually say I have a website. After looking up the various
free hosting options, at first I tried working with Python Anywhere. However, I
quickly ran into another problem, which was executing the code on a remote
server. 99% of tutorials rely on pip and a requirement file, which is not
sufficient for py4DSTEM, the crucial package I need to use, and which I find
only installs successfully using conda. So, first I had to figure out how to
make a conda environment for another platform/computer.
After lots of searching, I came across the concept of a conda lockfile, which
can target different platforms. The workflow is:
- Create an environment YAML file describing your environment
(
conda env export --from-history > env_name.yml)--from-historyis key, as it vastly reduces the requirements to only things that you have manually installed.
- Pass that to
conda-lock(installed viaconda install -c conda-forge conda-lock), e.g.conda-lock -f env.yml -p linux-64, where-fis the YAML file and-pis the target platform - This creates a file called
conda-linux-64.lock, where the platform name is specified in the filename. This then can install your exact environment withconda create --file conda-linux-64.lock
Containerization
With that in hand, I was ready to try to install the app somewhere remotely.
Funnily enough, Python Anywhere, while being owned by Anaconda, the company that
makes conda, doesn't currently support using their own tool to make an
environment that can then be used as a web app, so I had to look elsewhere. To
get around this, and to make sure the app was truly portable, I ended up going
down the Docker rabbit hole.
Docker has been a tech buzzword for the past 5-8 year, and has been making increasing advances in science as well. The concept behind containerization is to be able to be platform agnostic, and everything you need to run happens within the container(s), so there is no need to modify the code no matter if you run on Linux, MacOS, or Windows. Anyways, configuring Docker was its own whole side project.
In the Docker/containerization universe, you specify a file, usually a
Dockerfile, which builds an image. This image contains all of your code that
you want to run. When you want to actually run the code, you make a container
from your image. So the image is the source of truth, and you can create an
arbitrary number of containers from a single image. If you need to change your
code, you have to build a new image, but the image build process is cached, so
you don't have to start from the beginning. There is a lot more information on
how to actually do this, as well as some things that I found tricky, in my
Github repo.
Docker + nginx + gunicorn + Flask = success
To make a long story short (I can always expand on this if anyone is
interested), Flask apps are often served using Gunicorn. However, nginx is
used as a reverse proxy. IN MY UNDERSTANDING, this means when you configure a
server, requests come into a certain port (typically 80 for http requests). For
example, http://www.example.com/hello maps to an IP address, like
231.123.22.12:80/hello. However, behind this server IP, perhaps you have
another server running a part of the website, or static files that can be
directly served without any computation. nginx then takes these requests, and
as a reverse proxy, maps the requests to where they need to go. To continue our
example, behind the reverse proxy then another server, say
234.110.12.21:5001/test, actually computes the required HTML and then sends it
back to the request. That way the server that does the computation is isolated
from the outside world by nginx, and nginx is very lightweight and
efficient.
Setting up nginx is difficult - much like a Dockerfile, it is more of a
configuration file rather than a language, in an area I am really not familiar.
After struggling with it outside of Docker for quite a long time, I was able to
configure nginx both locally and remotely on my Oracle server. However, it
wasn't working in Docker.
Key to understanding Docker is that each container can run one command
persistently, and only one. However to combine both gunicorn and nginx, you
need two containers, one for each command, and they need to be able to talk to
each other. Luckily, Docker is designed for this; unluckily, it made my life a
lot more difficult/interesting while I struggled to understand what was going
on. In the end, I created an image that when run, created two containers. The
containers can pass information to each other, and even better, not to the
outside world, which I hope is more secure. It quickly gets complex when
manually specifying multiple containers, so this introduced me to the concept of
docker-compose
(see here in my repository)
and nested Dockerfiles
(nginx Dockerfile -
pretty simple, right?).
One huge advantage of using Docker is that it allows me to test the whole system
a lot more easily locally than if I was to run the different services just from
the command line. If the container runs on my laptop, I could be fairly to very
sure that it would run on the remote server. After a couple days, everything was
working locally. One optimization was made in order to reduce the image size
(from 5 to 2 GB), but one unsolved problem so far is that conda environments
have a lot of baggage. Ideally the image would be < 1 GB.
Oracle - the final frontier
The final step was then to make it work on a remote server. The terminology is
horrible - every provider uses different names and has different pricing schemes
for what they offer. In the end I went with Oracle because they have an "always
free" tier that I think I can rely on never charging me. It is by no means an
impressive machine, but it is free, and this site doesn't need much. To use it,
they give you an SSH key to download, which you need to chmod 400, so that it
is not modifiable. Then you can connect via
ssh -i ~/Downloads/ssh-key-2022-10-05.key ubuntu@ip.add.re.ss, where the
username is ubuntu because that is the Linux distro that I chose.
Using a cloud provider required a few changes - as mentioned earlier, gunicorn
has an argument for the number of workers it starts. So far -w 2 has seemed to
work, and setting up any more workers causes the server to crash as I think it
runs out of memory, due to the low limits on the free tier.
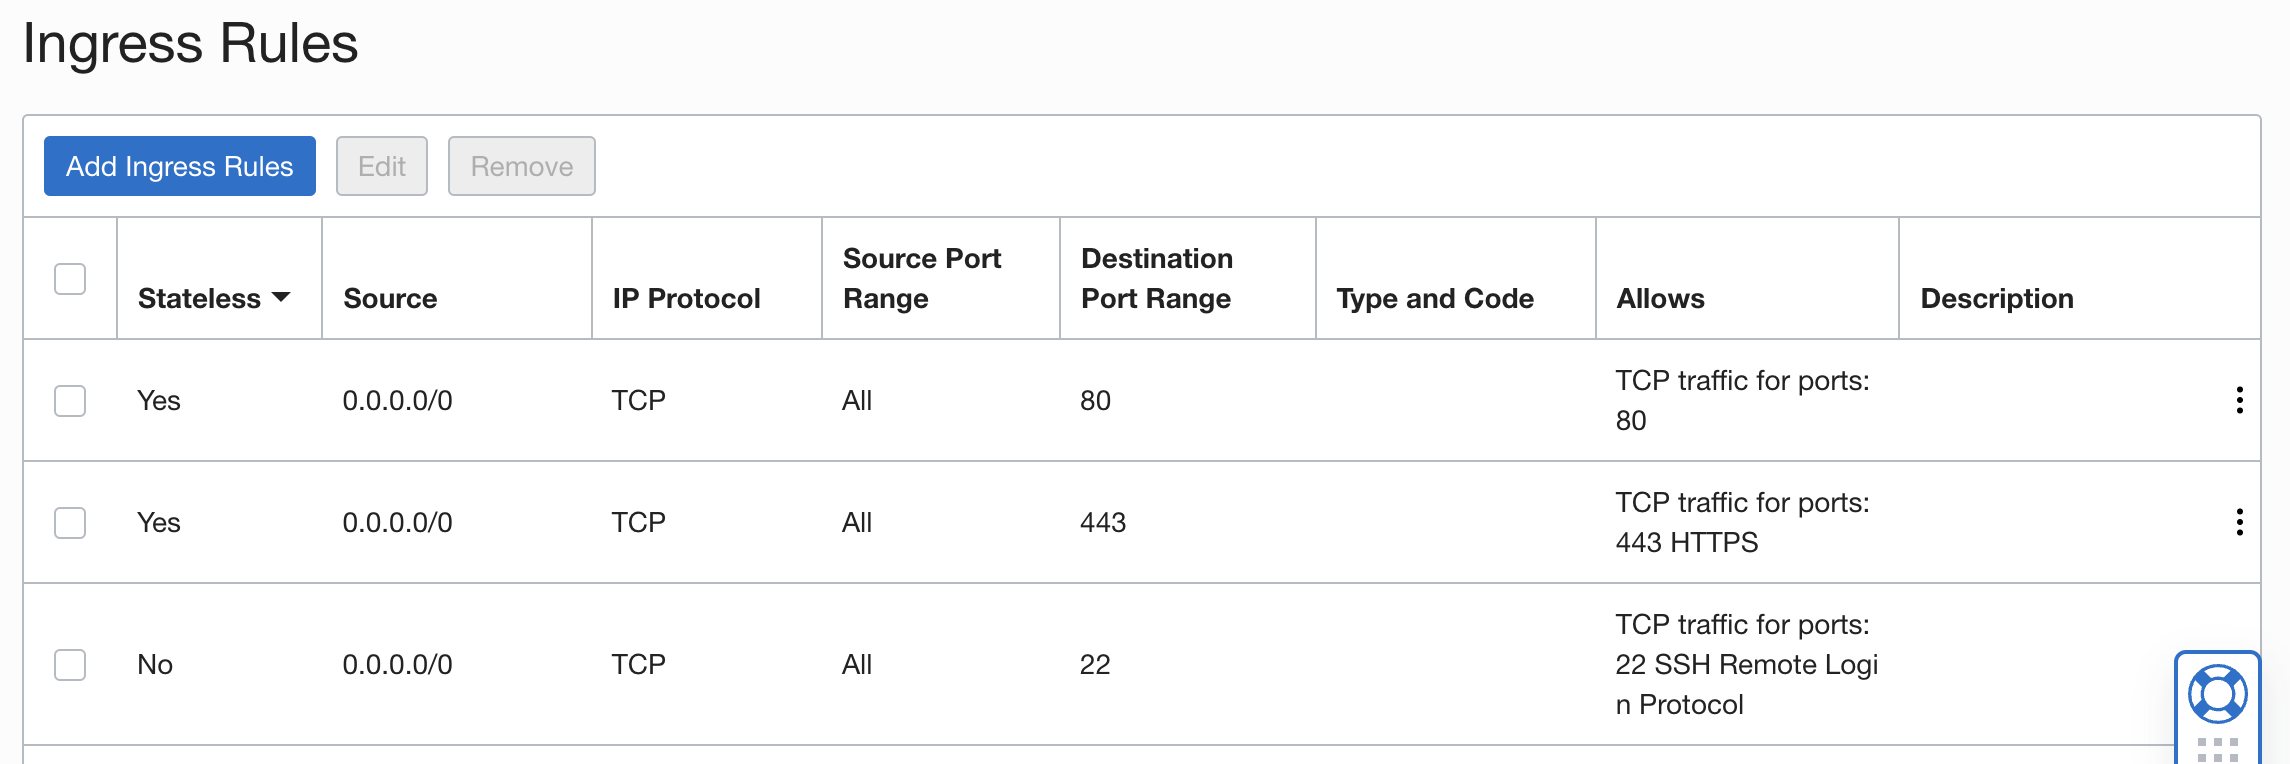
Then, to let my app access the outside world via HTTP (no S just quite yet... that is next), I had to expose port 80 to incoming connections. This wasn't the simplest to figure out, but when you start an instance, the main dashboard has an area for Primary VNIC (Virtual Network Interface Card). In this section, you have to click on the link after "Subnet", and then you can see your "Security Lists". I then modified my "Ingress Rules" to the values shown below - the only main change was opening up port 80.
Through the course of this, I opened many different ports to figure out how it
all worked with nginx, but in the end, nothing complicated was necessary. This
is a perk of nginx - it deals with port 80, and then sends it internally to
different locations, so that a bunch of different ports/routes don't need to be
open to the outside world.
Final set up and future ideas
At this point, things were pretty much set up. The last thing required was just
a synchronization between my local code state and the remote server. For this,
git was the perfect tool, and after a push and a pull, I was able to run
docker compose -f docker-compose.prod.yaml up --build and go to the server's
IP address and the site was up and working. Success!
The whole source code as of 10.10.2022 can be seen here.
There are still some things that have room for improvement. In no particular order they are:
- Configure
nginxto serve static files instead of Flask. - Log IP addresses of visitors to see where they are coming from/security reasons.
- Add HTTPS support
- Figure out how to automate the container building on the server side - how
can I
git pushcontent from my local machine and then have it automaticallypulland rebuild the Docker image, and launch a new container? - Figure out interactivity - ideally Plotly or Bokeh would be used to have interactive charts that would be more fun that just images.
- Figure out CSS and site design - it would be nice to have a better design for the site, especially if you view it on a mobile device. I would also like to understand CSS better.
Luckily I think this is all pretty possible, and the choices I've made so far seem relatively reasonable to build upon. Nothing is so fragile or unknowable such that improvements will require a huge refactoring. But I'm very glad to have made it this far!